Whooo-hoooo! I finally got this project done and dusted. Back in December, I made plans for some lingerie sewing. “Project C” was the one I really, really, REALLY wanted to work out well. So naturally, I procrastinated on starting it :-).

The Design

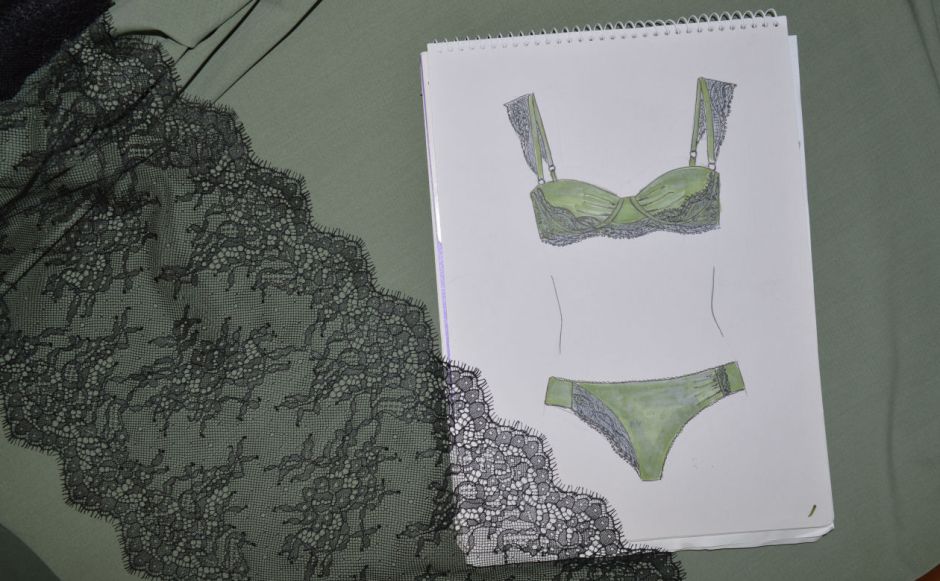
The design for the bra is based on a bra that I find while doing some snoop shopping in Melbourne a while back and made a quick sketch of the design after I left the shop. I think it had a price tag around the $100 mark for the set. The lace was gorgeous and I hadn’t been able to find anything that worked as well with the design.
The lycra and lace has been a bit of a compromise. Annoyingly made more so as the kit that I’d put together (plastic box with lace, findings, foam, powernet and bra pattern) went amiss at a recent group sewing day. The lycra was still in my basket, which was some consolation. The lace I’ve used doesn’t quite flow as well, so I’ve made a couple of changes to show of the eyelash lace.
For the bra pattern, I’ve adapted Merckwaerdigh Mix 4 view C (paper & PDF), which I used for the ‘sunset’ set in December. I’ve adjusted the upper cup for the balconette style to be a smooth curve, without the armhole section. My initial plan was to have the eyelash edge along the bottom of the band, but I ran into trouble making a nice transition from the lace on the cup onto the bridge. The best looking option was to have the eyelash facing up, and matched at the cup seam. So this flowed on to having the eyelash edge along the top of the bra back. Not quite the initial plan but the lace kind of dictated it this way.

The undies pattern is Merckwaerdigh SV32 view D. Again, I’ve made this quite a few times before. To match the bra, I’ve put the eyelash edge facing in on the inset section, and changed the gathers to three pleats.
Making the cups
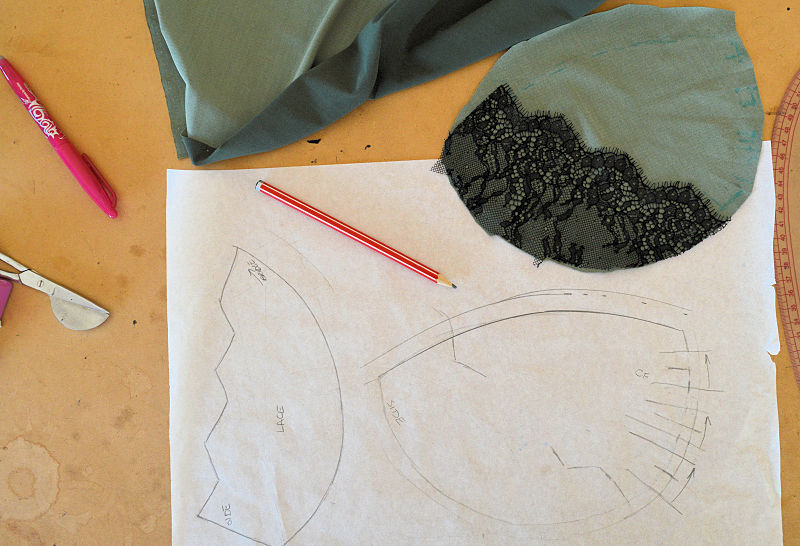
The cups were made from foam using the adjusted pattern pieces. I’ve sewn on a triple-folded piece of tricot over the seam line. This is step that is usually included in the Merckwaerdigh instructions, that I didn’t see done in Beverly Johnson’s Craftsy class. It is a nice touch to finish the inside seam, but also helps to stiffen the seam. I wish I had taken before and after shots, because before adding the tricot, the cup seam wanted to fold like a clamshell. But afterward, it has a nice smooth shape.

The top edge of the cup also has a single layer tricot tape stitched in to stop it stretching out. I remembered to sew in the base of the strap attachment before doing the cover. I have a habit of missing this step! The top edge of the strap is caught in the cover seam so there is no stitching on the outside of the cup.

For the cover, I’ve used the techniques described in Beverly Johnson’s “Foam, Lace and Beyond” class. She makes it look easy, but in practice I found it very fiddly to get the look I wanted and not cave in the foam. Putting the cup on the dressform helped support the cup while I fiddled with the fabric. In some ways I think it would be easier to baste the cover onto the cup before trying to do the manipulations.

Once the pleats were sorted out, I played around with the position of the lace. The repeat of the scallops didn’t work in my favour so I set the high point at the just off the wireline seam to match the bridge.

Accurate seam allowances were added a long the neckline edge, and a wider ‘just in case’ seam allowance was added to the wireline. When sewing the cover, the lycra and lace were treated as one.
The finished bra…

And set…


Sewing Project Score card


Super gorgeous, even if not exactly the same as your original plan!
LikeLike
I hope you found all the effort worth it because this set is gorgeous! Very sexy set that looks practical as well. Congrats for making lemonade out of lemons.
LikeLike
Stunning new set and your patience paid off. Sorry to hear that your things went missing.
LikeLike