
 I love it! It feels so nice to put it on and I know I’m going to wear it a lot!To my amazement, there are no wrinkles, the sleeve hangs perfectly, and doesn’t bind when I lift my arm up. I’ve also really surprised myself with the construction. 12 months ago, I could only dream of sewing a jacket as well as this.
This jacket is a combination of Lekala 4167 (main silhouette) and Lekala 5548 (dart configuration and sleeve fit).
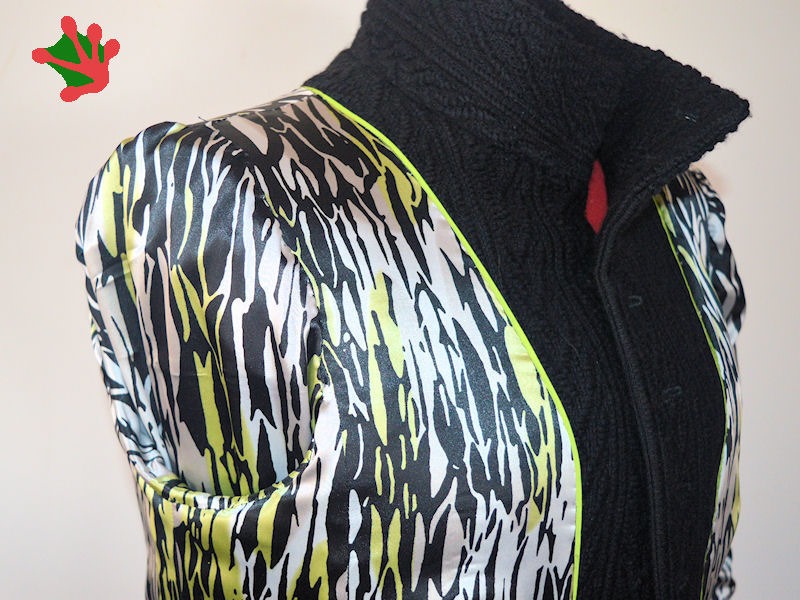
The fabric is a wool blend woven suiting.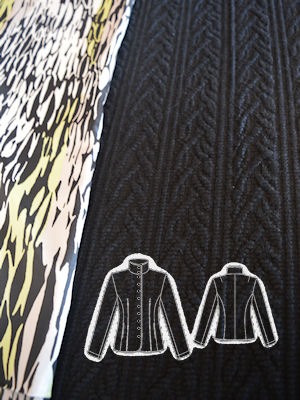 The weave has an overshot pattern that gives the impression of being a cable knit. The lining is a black/white and lime silk satin with lime piping along the facing edges.
Each piece was cut as a single layer to match the vertical lines and the ‘cable’ design. It took a while to layout but was worth it. The shoulders, neckline and armholes were stay-taped at the start of the process. I’m glad I did, as the fabric unravelled and was easy to stretch/shrink so the tape kept things firm and I knew where my stitching lines should be.
Because of the texture in the weave, I used a walking foot for the seam stitching to stop the layers slipping. My initial trial of sewing a buttonhole was a disaster, with the textured ridges in the fabric jamming the fabric up. The buttonhole foot on my Juki F600 comes with a removable clamping plate to help sew buttonholes on very fine fabrics. I was able to use this to sew all 11 buttonholes without a hitch. None of my previous machines had this plate and it is definitely worth its weight in gold.
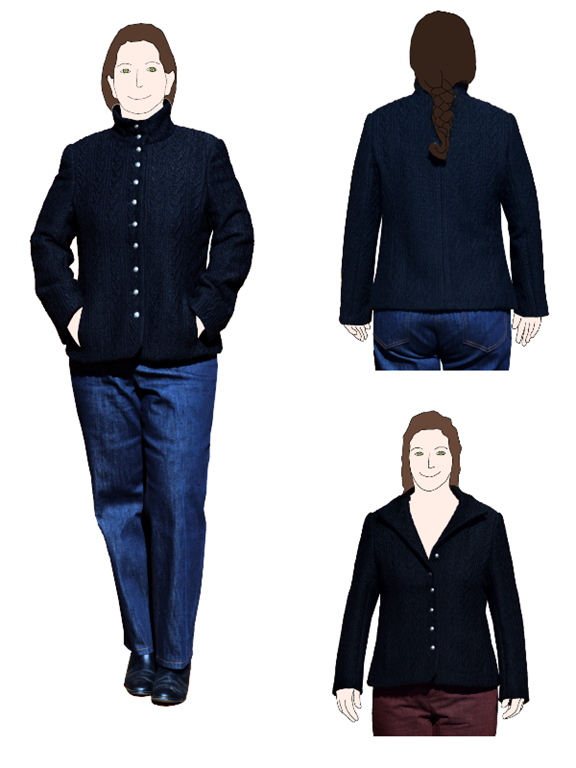
One thing I wasn’t expecting was that the collar can be turned down so it can also be worn like a blazer with varying depth on the V. The second pattern, especially the sleeve, will be my TNT pattern that I’ll use to check other patterns against. The custom fit patterns has taken a huge amount of work out of the process for me. I’d also recommend the “Fly front coat” course on Craftsy as I picked up a lot of tips from it that I used to modify the pattern and construct the jacket.
Pattern Information
4167 Pattern Description: Lined jacket with high collar. Front has waist dart and pockets in the side princess seams. Back has shoulder darts, centre back seam and side princess seams. Two piece sleeve.
As the previous reviewer has noted the sleeve bicep measurement on this pattern is HUGE. I usually need to add extra width, but this pattern gave me 15cm of ease and dropped the armpit about 5cm lower than it needed to be. The rest of the fit is really good
5548 Pattern Description: Collarless lined jacket with front zipper. Front has side panel and small bust dart in centre front piece. Back has centre back and side panel seams. Two piece sleeve. The side panels and smaller bust dart worked a lot better with the vertical pattern in the weave of the fabric -to make the seams much less noticeable. I used this pattern as the base pattern, and grafted in the collar, front pockets, button-up front and curved hem of the first pattern. It was also lengthened to match.
Pattern Sizing: custom sizing based on your measurements. Lekala patterns are fairly snug, so I use larger measurements for a bit more wearing ease.
Instructions: Pretty good compared to other Lekala instructions I’ve used – sparse but understandable. I would not recommended for a beginner but they would be OK if had made other jackets before. One thing to note, is that the collar is attached to the neckline seam, and then the top edge is sewn at the same time as the front edge.
The instructions are for a bagged lining but I did a mostly hand-stitched lining. I added lime green piping to the edge of the facing and a fell stitch to attach the lining to the facing. The sleeve, shoulder pads, sleeve-head and sleeve lining were attached using the process described in Kenneth D. King’s course. It is quite time consuming, taking much of a day to insert the sleeves, but I was really impressed with the shape on the sleeves. The sleeve-head is made from the jacket fabric. I’d recommend the course as I learnt so much from it – not just the how-to, but the why as well.
Alterations / design changes
As described above, this is a combination of two patterns.
- Fitting: The only change I needed to make for fitting was to shorten the sleeve by 3cm. The rest has no changes for fitting! ( previous jackets have taken me many weeks into months to fit – especially the sleeves – so to have a jacket fit pretty much first go is amazing. Even the pitch on the sleeve is perfect with no drag lines at all.
- Lining: The lining for the CB was cut on the fold with a 1″ pleat added for extra movement.
- Changes for turn of cloth:
- Inner collar: trimmed 1/8″ of the top and sides.
- Front facing: trimmed 1/8″ along the front opening, curve and hem
I made these adjustments after watching Kenneth D. King’s “Fly front coat” course on Craftsy. I think these made a huge difference to how the collar sits – there is no buckling of the layers. Sewing the curve section of the hem was a little tricky, getting the edges to match, but when I went to turn it, it just about flipped itself over and into place.
Part of my Autumn 2015 Wardrobe
At a Glance:
| Pattern | Lekala 4167 (main silhouette) and Lekala 5548 (dart configuration and sleeve fit). |
| Type | Jacket |
| Fabric | wool blend coat fabric, silk lining |
| Difficulty | 5 – lots of new techniques but worth it |
| End Result | 5 – as in ‘Did I really sew this???’ |
| Cost | approx. AU$100 (fabric $45, lining $20, buttons $17, shoulder pads $5, patterns $4, plus stashed piping, interfacing, organza, & thread) |

Really lovely work! Thank you fir the helpful, detailed post.
LikeLike