
This project started off looking for a way to knock-off this Proenza Schouler t-shirt. It is a tie-dyed t-shirt retailing around AU$400 on ShopStyle. I just hope that most of the cost was involved in the labour to make the t-shirt, rather than the label.
My initial thoughts on how to replicate the patterning was to make horizontal accordion folds and then place rubber bands every 1- 1 .5”. The dye would need to be applied in stripes, with a couple of contrast stripes thrown in. My previous attempts at this type of tie-dye hadn’t worked very well, so I thought I’d have a look at a shibori technique called Mokume (woodgrain). It is a stitched resist form of dyeing and creates patterns like you find in ripples of sand at the beach.
Materials Used
- Cotton jersey – I used an off-white jersey and cut enough to make the finished T-shirt (1m long by 1.40m wide). The fabric was pre-washed to remove any finishes used during manufacturing
- Thin strips of woven fabric to edge the stitching
- Sewing thread – it needs to be strong enough not to break when you draw up the stitches. I used left over bobbin thread, which worked well. Don’t use overlocker thread as it will break.
- Sun dyes from KraftKolour – Indigo ; Camomile+ Waratah for the orange. I used the sun dyes because they were quick and easy to use. They are just painted on and left to dry in the sun, and then ironed to set the dye. Areas that are in full sunlight will dye darker than those hidden in the folds.
Preparing the Fabric
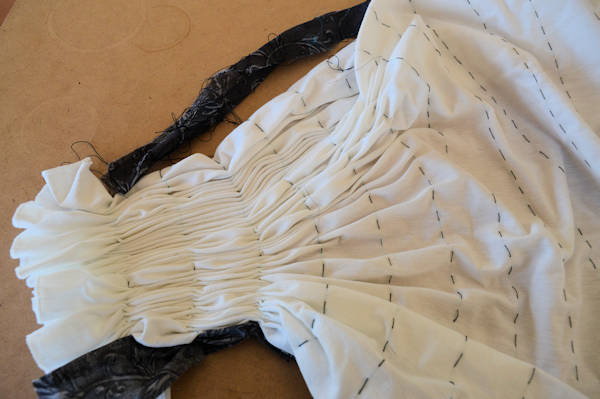
- Draw parallel lines on the fabric using a water-soluble marker to act as stitching guidelines. Traditionally this is done at close ( 1cm intervals) across the fabric to get fine folds. But, as I wanted something closer to the PS t-shirt I spaced them a ruler’s width apart and running up and down the fabric .
- Use a doubled thread to sew even running stitches ( 5-10mm) along each of the lines. Start and stop the stitching on the strip of fabric, running along edge of the fabric, to protect the outer edge of the fabric from dye, knot-marks or accidental nicks. Do this for each of the stitching lines. (Yes, you’ll be a master of the running stitch by the time you reach the other end of cloth!)
- Carefully tighten each line down one side of the cloth, spraying with water to increase the tension in the cloth, knotting together the two free ends of each line.
- Then go down the other side of the cloth, pulling the threads tight so the fabric packs up tightly. Make sure the knot at the other end is holding sufficiently well and doesn’t slip through the fabric ( yep, I had one of the knots tear through the woven fabric and slip through!)
The notes I was working from say to thread 5 needles, stitch each line in turn, leaving the needle attached. The first 2 rows are gathered up and knotted, then the next two rows are stitched. Then you just repeat this process all the way to the end. Initially, I was gathering the threads as I went, but I was finding it awkward to work with. So I stitched all the rows and then did the gathering up at the end.
I did the stitching over two weeks. A bit each night in front of the TV. It is a good way to use up left-over bobbin thread. I found it strong enough to draw up the fabric. There were a few lines that I worked using overlocker thread, and the threads broke as I pulled them up. It was tedious to re-sew them and the folds were not as tight as the other lines.
Dyeing
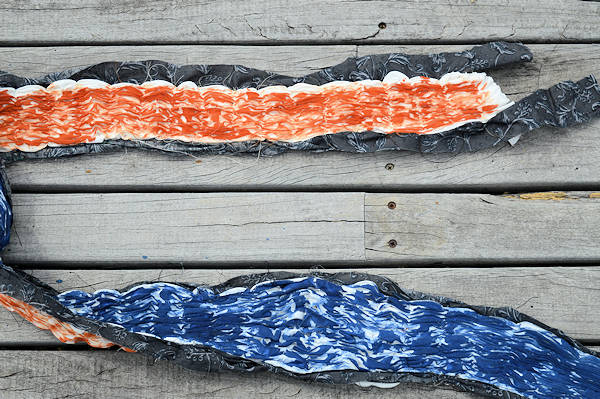
Traditionally the fabric would then be placed in a dye bath. Because I wanted to use different colours, I decided to use the solar dyes. You will need a nice sunny day to do this.
- Started with the Indigo (blue) dye, diluting a small amount in half with water. Paint this onto one side of the cloth. I was trying add enough to get an even colour but the dye just sitting on the top of the folds. Wait for the dye to dry
- Apply the second colour to the other side and wait for it to dry. For the second colour, I used equal part mixture of camomile (yellow) and waratah (red) with a dash of blue to get a burnt orange colour.
- Cut the threads to release the fabric. Make the snips on the woven strips to avoid accidentaly cutting the fabric.
- Iron the fabric to set the dye. I found that the dye set very well and didn’t notice any dye-run when I washed it

Results
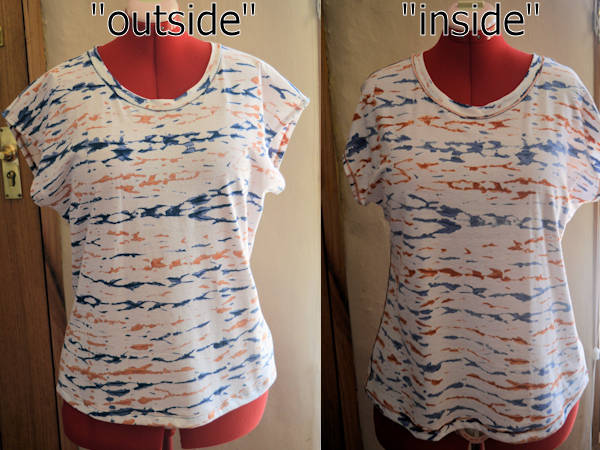
When I was painting the fabric, I had a sinking feeling that it wasn’t going to look good, but I was pleasantly surprised by how it turned out. The orange dye is painted onto the back of the fabric, so it looks paler form the front. Similarly, the blue is lighter on the back. Both sides are a little different but I’m tending to like the reverse side better. Because the stitching lines are further apart, the lines are a lot fatter than normal mokume. There was one corner where I lightly applied the dye that looks like the traditional effect. Where the folds have been a bit fatter, the sun-dyes have given it a bit of a watercolour effect. It kind of reminds my of a sunset, with the sun just skimming the bottom of the clouds.
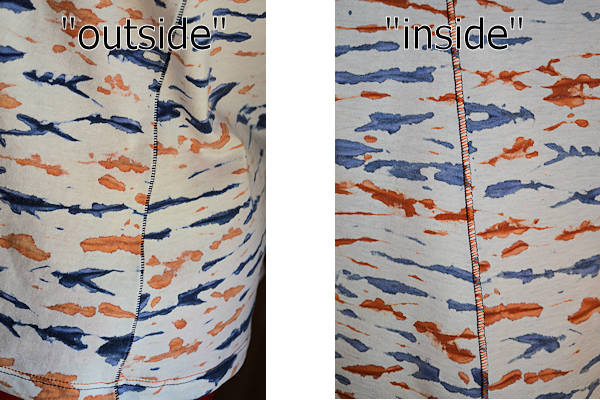
I couldn’t decide which face I preferred so I made the t-shirt up so it could be reversible. Instead of using standard over-locked seams, I used flat-locked seams using blue thread on one side and burnt orange on the other. The t-shirt looks a bit different to the one I set out to make, but I’m very pleased with the result. Not your average tie-dye T

Love it, the colours and how it turned out and very clever to make it reversible.
LikeLike