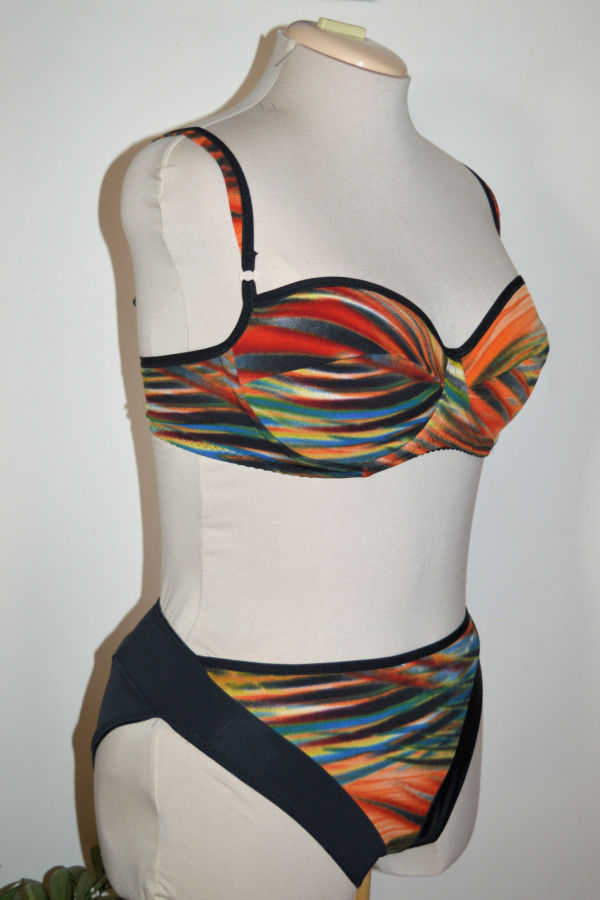
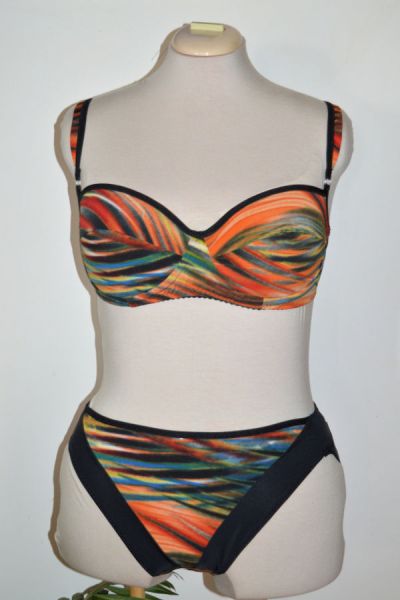
Despite the heat, the last couple of days has been quite productive with two bra/pantie sets and a strapless bra. My favourite would have to be the set made from a knit top that I rarely wear. It’s remake is quite stunning.

In my previous post, I included the drawings and fabrics for what I was planning.
Project A
The fabric is a poly print that I picked up at my favourite fabric shop. I’m not sure that the colours show up well. The main colours are a minty green with charcoal and black, with shades of a dusty purple. The inside is fully lined with black powermesh for support. Elastics are a combination of black and hand-dyed charcoal.
The bra pattern in Merckwaerdigh Mix 30 , which I’ve made quite a few times. It’s kind of my go-to pattern for all-print bra. It has a lovely squarish neckline. By sewing the edges right-sides together, the edge elastic can be enclosed, leaving a clean finish.
The boyshorts are a self drafted pattern created from a leggings pattern with the side seam removed. For this version I’ve added a 5cm wide waistband. The crotch lining is extended up to the waistband for a bit more coverage. Although this set isn’t exactly swimwear, I’ve tried to make them so that they could be used for togs if necessary.


Project B
So far, I’ve only made the bra for this one. I needed to recut the bra-band after a messing it up and didn’t have enough fabric to do the pants. The pattern is Merckwaerdigh Strap4 which I trialled last year. I wasn’t happy with the shape of the underwire I used on the first one, so I’ve tried a different brand. This one fits me better and made a huge difference to how the bra sits.
From my initial sketch, I was planning to increase the depth of the band by about 5cm to better frame the gold detail of the lace. I forgot to order the hook and eye tape and had to make do with a 4-hook high closure. The band has been lengthened by 3cm at the front and then tapered from the side to the closure.
I’ve added boning to the side, just behind the cups. I’ve used a 1/2″ elastic on the top and bottom of the band for extra support. The cups are made from cut and sew foam, with stabiliser tape stitched along the top edge to prevent it from stretching. The cover is stitched 2mm from the edge and then flipped over. I think this is a little too narrow and makes a bit of a hinge for the edge fold over on itself. For the next version, I’ll add a bigger seam allowance to the cover and lower the stitch-line.
Apart from that, I’m really happy with how this turned out.


Project E
I wasn’t quite game enough to tackle Project C at this point. It requires the testing of a different bra pattern and some extra pattern work. The heat was getting to me, so I’ve opted to test the bra pattern out on another project before making any changes to it.
The fabric is from a top (Burda 7828) that I made about 5 years ago, but have only worn a handful of times. I love the colours in it and decided to remake it as something more useful. This set is more swimwear oriented.
Both patterns are from Merckwaerdigh: Mix4 view C for the bra and SV32 view B for the bottoms.
The bra is fully lined with powernet and the top edges are finished with fold over elastic. When attaching the elastic, I did the neckline (top of cups and bridge) first. Trimmed the edges and then applied the elastic to the top of the band, leaving a long tail to attach the ring. The arc near the back closure was then done in the same way.
For the bra straps, I cut a 3cm lengthwise piece of fabric, folded it in half and tapered the edges. Then the raw edge was bound using the fold-over elastic, leaving long tails of the FOE to thread into the rings. I think the result is quite effective.
I’m tossing up whether to make a tankini version using Mix4 view C with the left over fabric.
The bottoms have a similar style to the one-piece swimsuit (BAD24) that I made recently, with the front side panels wrapping around the form the back waistband. It isn’t the most straight-forward of designs to sew, especially applying the elastic. I’ve used FOE on the top edge of the from panel, and a narrow piped elastic on the other edges. The print fabric is lined with swimwear lining as it is fairly thin. The black is a firm swim lycra.
I really like this set. It’s quite striking.


I am very impressed with all of these! They are quite lovely. I have a question, though, when you sew your sets in swimwear fabric, can you wear them comfortably as underwear? They aren’t too hot? Just wondering. And that remake is quite stunning. I love those bottoms so much! I was very taken with the swimsuit you made in this style. It looks like it affords lots of movement as I am partial to a high leg, but the back looks like there would be no creeping up or down. Has that been your experience with makes from this pattern? Sorry for all the questions. If you weren’t so inspiring, I wouldn’t ask so many!
LikeLike
Thanks Becky. The print fabrics are just normal knits that you would make a top out of, much thinner than swim fabrics but a little heavier than lingerie knits. Using the powermesh rather than swim lining also helps them breathe. They are hotter than laces or cottons, but much cooler than traditional swimwear or padded bras.
I don’t find that the back of the one-piece swimsuit shifts any. The side panels aren’t a straight cut that you see in most colourblocking styles, but have the seamline bowed out a bit to create a slight cup effect, which I think helps. It is a really great ‘active’ swimsuit to wear.
LikeLike
Very pretty lingerie and impeccable workmanship!
This is the first time I’ve visited your blog and I’m fascinated with your dress form. Did you have a blog entry about your dress form? I’m particularly intrigued with the two stands (one for each leg) as opposed to a single pole.
LikeLike
Hi! Thanks for stopping by and leaving a comment. Sorry, but I haven’t written up anything about the changes to the dressform. It is a Singer model that I’ve done some crude modifications to. It was only meant to be a temporary measure until I made real legs, but I never got around to it. Inside the form, I’ve added a block of wood a hole to fit around the original pole, and two half depth holes which sit over the ‘legs’. The base is a timber X, casters at each corner, and the two poles inserted into them.
LikeLike
thank you for your reply with some helpful info!
Carol
LikeLike
Wow I an inpsired by all of your pieces, but the strapless one is stunning.
Wishing you a fabulous 2019.
LikeLike
Thanks Sharon. Hope you have a wonderful New Year filled with happiness, health and awesome projects
LikeLike