
A short sleeved fitted shirt with collar and stand. Not overly remarkable in itself, but did I mention that I hand-drafted it, from my measurements?
Yay, I finally got the bodice block drafted and fitted. Like the pants block, this one also turned out to be a bit of an epic.

Drafting from scratch isn’t everyone’s cup of tea, but considering that I blitzed all my tech drawing classes at high school, I’m pretty comfortable with the drafting process. Fitting isn’t my strong point though and I usually have to make a lot of adjustments to commercial patterns. By making my own sloper, I’m hoping to go through the pain of fitting once, and then modify the sloper to get whatever design I want. The task I’d set myself was to draft a fitted sleeveless shirt with collar and stand. Something like this 
When Suzy Furrer’s Craftsy classes first came out, I bought the bodice sloper and creative sleeve class during a sale. After my hassles with the pant draft, I’d been putting off working on the bodice and sleeve. Time to bite the bullet….

Draft 1 : Moulage from Suzy Furrer’s Bodice Sloper Class
Drafting the pattern was the fun part. Fitting went reasonably well, with just some minor alterations to the shoulder slope, armhole curve and straightening the side-seam. Looking at some of the class photos, there were a lot of very wonky side-seams, which passed the QA of the instructor. Some interesting observations of my draft, such as a short back armhole length, but broader depth as compared to commercial drafts. I do have a fairly straight back.
Draft 2: Moulage to sloper
Drafting changes were easy although the resulting sloper wasn’t a comfortable or neat fit. Enter gaping, low armhole, sway-back puddling and not enough ease around the torso (just 1″ allowed). The class abruptly ends with the sloper draft. It would have been nice to create a shell top from the sloper to have a finished product from all the hard work. You need to the “Drafting Tops” class for that.
Draft 3: Fitted sleeve
 When watching the video for the sleeve draft, it seamed a lot more convoluted than other methods that I’d seen. I was having trouble getting enough width in the sleeve for the given armhole lengths, so I started to look at other drafting methods. One that I settled on was the draft from Donnanno, which dropped out fairly well. The sleeve fit was quite good, although I was far from happy with the sloper draft.

Draft 4: Fitted blouse block from Donnanno.
I fiddled the draft a little to use measured depths for the base of the armhole etc, rather than using the proportional rules of thumb. The draft in this book has a different way of determining the armhole widths ( either from the bust measurement or proportion of a circle). I found the latter method gave me the space I needed at the back armhole. The draft is also much simpler than Furrer’s method, with the bust dart drafted into the shoulder, and waist-shaping. The amount of ease is plugged into the draft formulas, but I found that using the recommended ease for the fitted shirt worked very well. Only minor changes to the shoulder slope and a little extra over the bum was needed. Looking back, I should have raised the bottom of the armhole when I adjusted the shoulder slope. Overall, it was a lot easier process and the results were more usable. Working in metric, rather than imperial, was also a big advantage for me.
Draft 5: Collar with stand; Button band

Again, I tried Furrer’s method for drafting the collar, but didn’t like the shape of the collar; the collar points being wide-set and squarish. She gave excellent instructions/theory around drafting the button band and it’s relation to the width of the button, but no details on how to change the shape of the collar points. Draft #2 of the collar was from Donnanno. It had a very pleasing shape to the collar, similar to a draft I’d seen from La Mia Boutique, that gave a really nice collar. Donnanno doesn’t go into explanations as to why various offsets are used (eg like the button band extension is just given as 2cm) so the background from SF’s class was handy.
Draft 6: Short Sleeve
This draft was made in a hurry. Originally I planned to have the shirt sleeveless, but DH made a disparaging comment about sleeveless shirts. Miffed about the comment, I hastily drafted a new sleeve for the Donnanno block using the armhole measurements for the second sloper. It didn’t quite look right, as I think I’ve made a calculation mistake, which threw off the top shoulder seam notch. I need to redo it, but I’d had enough of drafting and the heat and just wanted a finished shirt. If I stopped now it would probably be another year before I summed up the courage to give it another go.
Final shirt
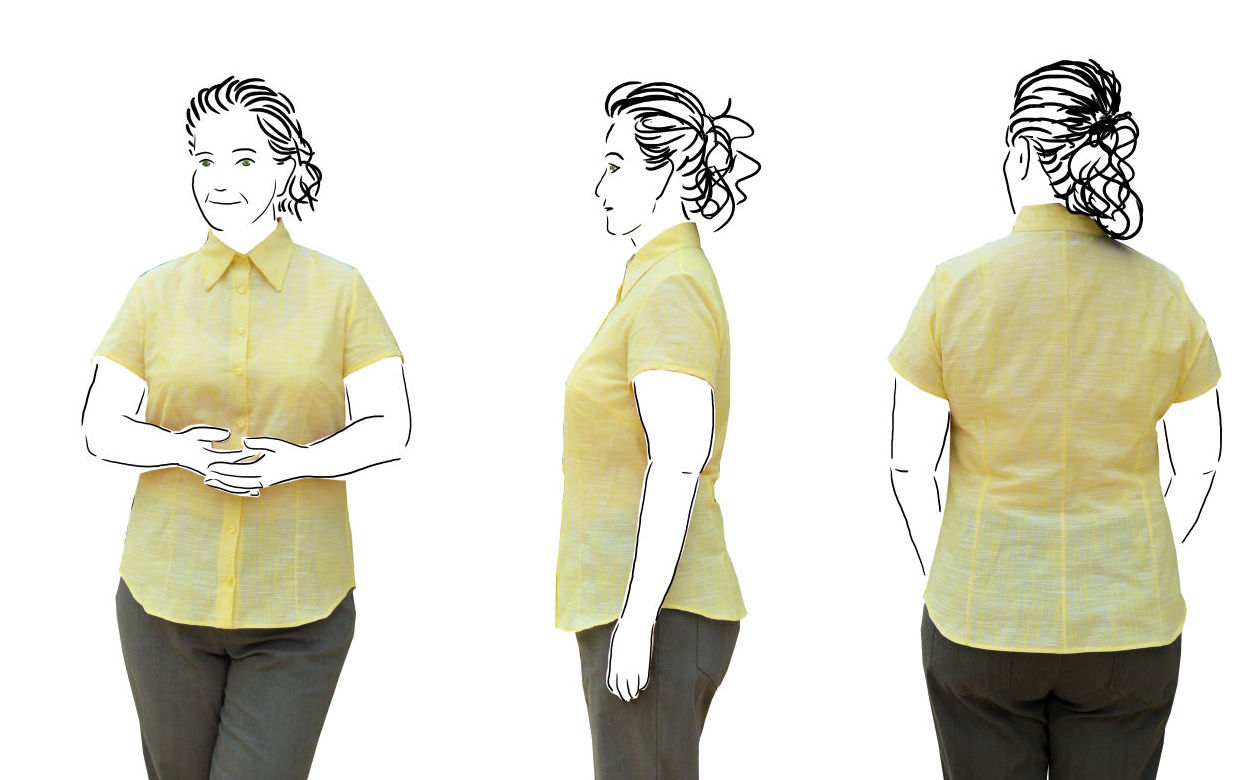
So here it is. Great fit though the torso and I love the fit and shape of the collar. The back armhole and sleeve-head needs a bit of work but is actually better than the fit of a commercial pattern.
Constructed with French seams, machine rolled hem, sew-in interfacing in the collar a-la David Page Coffin, complete with quilting pass on the collar stand.
It’s been a convoluted process, but I’ve learned a lot on the way. I’m looking forward to making some variations from the fitted-bodice block in the near future.
Sewing Project Score card


This is really impressive! Way to stick with the challenege. The fit looks great. I have Suzys pants sloper class and need to work up the motivation to finish it. Sounds like it takes time but is worth it in the end.
LikeLike
Thanks, I’m going to have another crack at the armhole and sleeve fit. I hope you get the chance to work on the pants sloper. Maybe we can do it together?
LikeLike
What a success! One day I hope to find the time, or more accurately the patience, to go through all those Suzy Furrer classes I’ve owned for years. By the way, I think you need a sleeveless version of this. Prove DH wrong.
LikeLike
Oh, yes,yes, yes! Just the encouragement I need 🙂
LikeLike
Looks great! It’s pretty amazing what a difference the various drafting techniques / theories can make.
LikeLike
It’s quite interesting to see the different ways to go about it. I briefly looked at a few other methods – all different.
LikeLike
Impressive! This requires persistence and patience, and it appears that it is work it. I think the fit is terrific, and I assume small changes may need to be made for fabric attributes, but you now have your perfect sloper! I love the yellow linen as well.
LikeLike
Thanks Becky. I don’t often wear yellow, but I’m liking this top.
LikeLike
It turned out so well! I have been planning to try to draft a sleeve from scratch for awhile so thanks for that resource.
I still love those pants :-p
LikeLike
Thanks, I’m liking the pants more now that I’ve removed the elastic from the ankles. I wore them yesterday with a dusty pink T. I hope you get a chance to work on the sleeve draft. There are quite a few methods out there, so if one doesn’t work out, try another.
LikeLike
This is great!
Did you have trouble with your armhole coming up too short and having to raise the shoulder slope to get that measurement on paper. I am currently taking that class through craftsy and they have disabled the pictures and comments from the past. If you have any suggestion for me, I am kind of stuck at this point!. Thank you!!!
LikeLike
It is a real shame that a lot of the comment section has been lost as it was really valuable. From memory, the Furrer draft was really short though the back armhole. I’ve found that I’ve had better success with other drafting methods.
Did you mark the horizontal balance lines? These can help work out where you need to adjust. If you think that it is fitting you well from the x-back down, then open the shoulder seams and see where you need the extra length ( ie just to the back or changing the slope of the shoulder). For me, I think I needed to added 2cm evenly at the X-back as well as a squarer shoulder slope. Good luck!
LikeLike
I decided to use the method of the moulage from Kenneth King’s book. It looks like it is clear on all the adjustments. I will keep these tips in mind as I draft my moulage again. Thank you!!
LikeLike