My togs are finished and road- swim- tested! Armed with the English instructions the pieces went together like a breeze. I’m really happy with how they have turned out. You can see part 1 here.


Construction
The instructions are concise but very clear. You are guided as to what stitch to use on each step. My sewing machine has 10 memories, so I have the narrow zigzag and three-step zigzag I use for lingerie sewing already setup. On the overlocker, I had woolly nylon in the loopers. The elastic is attached using the overlocker and overstitched with a 3-step zigzag. I’ve normally used a zigzag to attach the elastic and overstitched with a coverstitch. The elastic is attached using the overlocker and overstitched with a 3-step zigzag. I like this newer method as the inside edge is a lot softer against the skin.
I started with all the pieces laid out as they would be when sewn. With no side seams, and the bands wrapping out the body, I found this helped me get a better idea of how things joined up. As a lot of pieces don’t start or end at the same point, how they line up is really critical to the design. The locations of the notches have obviously be well thought out as they made it really simple to line every thing up. I was expecting to have trouble with the bands, but the pieces literally fell into place. This would have to be one of the best drafted patterns I’ve used.
Final Product
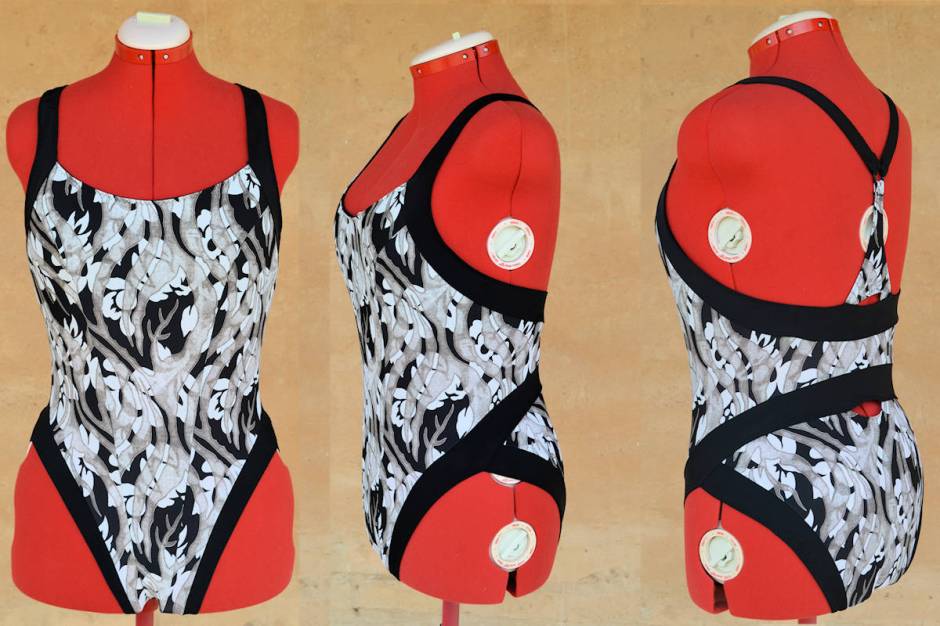
I’m really happy about how this turned out. I think the colours have worked out well and I’m so glad I didn’t go with the original stripy fabric on the bands. I love the ‘flow’ of the black bands. It is hard to describe, but if you have a look at the photo series below, hopefully you will see what I mean. The shapes unfortunately, particularly at the crotch, are distorted by fitting them over my dummy, but I don’t want to post live-model shots.
The fit feels really good. The internal bra offers a lot of support – from the bra band, rather than the shoulder straps. No uni-boob or squishing into submission. There is also lots of freedom for the shoulder blades and the racer back style keeps the shoulder straps in place. The length feels a tad short in the upper torso, but I think once they the fabric is wet, it will be fine.


And the Swim Test…
It was 38oC yesterday so it was perfect for going up to the lake for a swim after work. The togs were great to swim in. I think I’ll enter them in the Activewear Contest on PR.
I also had a chance to swim tested my new boardshorts. More them soon….
At a Glance:
| Pattern | Merckwaerdigh BAD24 |
| Type | View A |
| Fabric | Swimwear lycra |
| Difficulty | 3 – much easier than you would think. Exceptionally well drafted. |
| End Result | 5 – TNT. Definitely be making more from this pattern |
| Cost | $28 ( $18 fabric, $10 elastic + thread). Enough fabric left over for a colour blocked rashie |

Fabulous swimsuit
LikeLike
Lovely swimsuit. I just ordered this pattern, but I know I will have to lengthen at the waist. Do you think that will be possible with this pattern? I am not very experienced at adjusting patterns.
LikeLike
Thanks! I’ve been wearing it 3-4 times a week so I’ve been thinking about making another one.
It would be fairly easy to lengthen at the waist as you are just changing the two main pieces. If you need to add length anywhere that the bands run through, it would be a bit more involved as the bands are curved. How much length to you think you need?
LikeLike
Thank you for your kind reply, I think I can get away with just adding length at the waist. I typically have to add length (in a dress pattern) from the shoulder to the apex, under bust to waist and waist to hip. In total, I think I add anywhere from 1.5 to 2.5 inches. With a knit fabric I am thinking I could add length just at the waist. One piece bathing suits are never long enough and thus I can’t buy RTW one piece suits. Usually, I am fine in a tankini. Thank you for you help.
LikeLike